Optical pyrometer
Introduction
Units are expressed in metric and prices in US dollars, unless otherwise stated.
An optical pyrometer is a device which allows contactless temperature measuring by using the incandescense
color. It is based upon the fact that all black bodies do have the same incandescense color at a given
temperature. It is very straightforward and allows any temperature from which a hot object emits light ( >
500oC). It is made from a small magnifying optical device (like a monocular or very small
telescope) in which a small incandescent bulb is placed which image is sharp when the user views through the
eyepiece (the lens(es) on the eye end of the optical device). The background is the hot object to be gauged.
The electrical current flowing through the filaments in the bulb is an indication of their temperature. This
current is controlled by a potentiometer which is put between the power source (a battery) and the bulb. An
ammeter is used to display the temperature. Its range is from 500oC (== 900oF lower
limit when an object incandesces) to 1600oC (3000oF), which is suitable for most
applications.
Needed
The stuff needed is available in a local hardware or electronics shop unless stated otherwise.
-
Small optical device. A 5x20 (5 = magnification, 20 is objective (front lens) diameter in millimeters)
is OK. It should be able to focus till less than 30 cm (1 foot). Available at a second hand optics dump
store for a few dollars. Wnat can be useful as well is a 50 mm standard SLR lens, available for a low price
second hand in a camera shop. In the latter case, the back cover should be included, which allows attaching
the lens to the pyrometer.
-
Battery or batteries to make 5 or 6 Volts. Four nickel-cadmium, nickel metal hydride or alkaline
penlites in a four batteries holder are suitable.
-
A resistor of 47 Ohms 1/4 Watt when you use 1600oC range to protect the ammeter from
overflow. When alkaline batteries are used (4x1.5 = 6V) instead of nickel (-cadmium) ones (4x1.25 = 5V),
take a 56 Ohms one.
-
A small incandesent bulb, not larger than 7 mm in diameter, otherwise it blocks the background
image of the hot object. It should not draw more current than 100 milliamperes. Take a 6 Volts one. I have
a 6 Volt / 100 mA one. An ordinary bicycle light bulb is usually too large in size.
-
Potentiometer of about 470 Ohms linear and a round knob easy to handle. Take preferably a 10 stroke
potmeter, rather than the ordinary 270 degree stroke ones. That is for easier controlling the current
throught the filament.
-
Low-power power switch.
-
Low-current wires.
-
A 32mm (1 1/4") PVC drain pipe of ca 5 cm long.
-
Plastic box of about 100x60x50mm (4" x 2 1/2" x 2"), which is available in electronics shops and mounts
to attach it to the optical device.
-
Analog voltmeter with 2 Volts range. A low range ammeter (e.g. 10 mA) serial with a 200 Ohms precision
resistor (1 % tolerance) can also be used. When full 2400 C (4400 F) range is used, take a 500 Ohms
precision resistor and omit the first 47 or 56 Ohms resistor. In this case, only one-third of the scale is
used for the first 1600 degrees, so this is recommended when you use very high temperatures often.
-
When using high temperatures (over 1300oC), a welding filter glass.
This all should not cost more than $40 all together. The camera lens can be obtained at a photo repair shop.
Tools needed:
-
A simple multimeter which allows measuring DC milliamps, ohms and volts. Available from about $30 in the
local electronics shop, or you might borrow it from a friend.
-
Soldering iron and solder.
-
Screwdrivers, sharp knife and piercing device (or a small drill).
-
Torch or furnace which is able to reach temps you need to be measure and some pure metals (nickel,
copper, gold, aluminum) to calibrate. A thermocouple with a proper display can also be used.
Assembly
-
Take off the eyepiece of the binoculars and put the film box between the eyepiece and the prism box.
This is necessary to make the light path longer to allow viewing close objects (as your furnace is) sharp.
Try out what the best length is. Maybe you must cut off a part of the film box. Attaching the eyepiece to
the film box can be done best by a 30mm hose clamp.
-
Pierce a hole in it to put the light bulb on the front side of the eyepiece, in such a way that you see
it sharp from the eye end of the eyepiece.
-
Connect the bulb in the following way:
-
Plus of the battery to power switch
-
Power switch to 47 Ohms resistor then to the left contact of the potmeter.
-
Center contact of the potmeter to bulb and the ammeter + 200 Ohms precision resistor and bulb in
parallel and that back to battery ground. The whole stuff should be built in the plastic box with the
potmeter knob, power switch and the ammeter on the front. Check for the polarity of the ammeter. Attach
the box to the binocular, such that the wires to the bulb in the eyepiece are properly fitted and the
controls (power switch and potmeter knob) are easily to reach while viewing through the eyepiece.
Here is the electric scheme:
                           6 V 60 mA bulb
  R=47 Ohms            ------(X)------------------
              \        |                         |
 + |--XXX---- X\X      |                         |
   -            \--------- O ------- XXX --------|
  ___                                            |
 - |                                             |
   -----------------------------------------------

5..6 V      470 Ohms       10 mA     200 Ohms 1%
battery     potmeter      ammeter     resistor
|
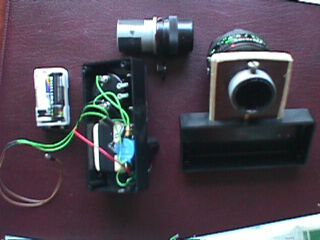
The opened pyrometer
|
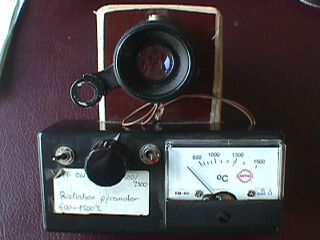
The finished pyrometer
|
Calibration
When it is all assembled, then the heat goes on....
The readout takes place the following way: Point the pyrometer to the object to be measured, preferably a
nonlustrous object (blank metal surface) and not at flames, because the latter are gases or scattered
soot particles. The glowing filaments in the bulb in the pyrometer should be in the image of the object. Turn
the potmeter so far till you hardly see the top (hottest part) of the bulb filaments. Then the temperature of
the filaments is correct and you should read the current on the ammeter Determine which calibration
temperatures you are going to use. If you have a thermocouple and a furnace with a stable temperature
and the display of the thermocouple is correct, just adjust the furnace to a few round numbers (e.g. 600 C,
1000 C or 1000 F , 1800 F, etc.) and read the current for these values when you point the pyrometer at the
thermcoupleand the filaments of the bulb glow the same color.
When you don't have a thermocouple, melting (or freezing) metals is another option. The best are:
pure platimum                           1773 C / 3222 F
pure nickel                             1453 C / 2647 F
pure copper (use a reducing flame !)    1083 C / 1981 F
pure aluminum (calibrate with low light) 660 C / 1220 F
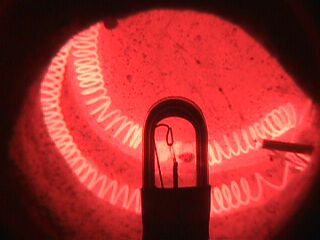
View of a Kanthal-wire fired furnace through the pyrometer
Point the pyrometer on a thin oxide layer, as the lustrous metal reflects too much and does not show
exactly the proper color. Repeat each calibration once or twice to be sure about the correct temperature.
Write down all currents matching the temperatures and make an interpolation to make a new scale. Do this on
a piece of paper with the same size at the ammeter scale.
When putting the scale on the ammeter, remove carefully the plastic cover of the ammeter and
(don't touch the needle hand!) paste it carefully over the ampere scale.
Usage
Now your pyrometer is ready for use. When batteries get low, it will not affect the accuracy, because the
display is just the voltage over the bulb and low batteries will just limit the range. When using high
temperatures (over 1300 C) placing a welding filter between the light bulb and the eyepiece or in front of
the front lens (objective) is a strong recommendation to protect your eyes. But not between the object
and the light bulb, because then you filter the hot object, but not the light bulb.
For more info you can mail me.
Rev. Sat 22 Feb 2003
|
 and Mac
  and hosted under Linux.